

Connie & I have now completed 15 years of commercial tours & expeditions. (The fair dinkum tyre work actually began a couple of years before we kicked off touring for a living.) I can’t remember how many tyres I’ve repaired but it would be in the hundreds, and I’m not talking about those bloody plugs either, most repairs have been in the bush while travelling but a fair number when at home both before & after a touring season as well, including a few folk who make the effort to call in and get repairs done. I’ve learnt many things about tyres, how to use them and of course how to repair them and I have tried to pass that knowledge on to folks that are interested, not sure how successful I’ve been over the years but you can only do your best & what you think is right.
It is disheartening to see how many folks travel in remote areas with pretty much bugger all knowledge about their tyres apart from some "words of wisdom" from someone selling them those same tyres. So much of the "knowledge" being passed around these days is just marketing plain & simple. This applies to almost all industries & sectors in this modern age it would seem.
The images and notes below go through most of the major events with tyres during the season. Most of it fell into the "completely normal" category, at least in my opinion. I’ve tried to explain things as best I can but if anyone has any questions about any of it drop me a line. I’ve put plenty of pictures in this report for those that don’t like reading.....
Mick Hutton
| Type of Travel | Month | Distance | Vehicles | Total Problems | Mick's Tyres |
|---|---|---|---|---|---|
| Home N.S.W. to Kalgoorlie W.A.-----OD 439,603 | ------ | 3215 kms | ------ | ------ | ------ |
| Tour – Rovers in the Rough | May | 1909 kms | 5 | 4 | 0 |
| Mini-expedition south west GVD & around | ------ | 2101 kms | 2 | 1 | 1 |
| Tour – Frank Hann & More | June | 1964 kms | 8 | 14 | 0 |
| Cocklebiddy W.A. to Home N.S.W. | ------ | 2539 kms | ------ | ------ | ------ |
| Home N.S.W. to Coober Pedy S.A. | ------- | 1821 kms | ------ | ------ | ------ |
| Tour – Emu to Sandy Blight | July/August | 3403 kms | 8 | 2 | 1 |
| Tour - Central Desert Explorer | September | 1899 kms | 8 (9) | 7 | 2 |
| Yulara N.T. to Home N.S.W.------ OD 465,767 |
------ | 2677 kms | ------ | ------ | ------ |
| Total distance travelled for season = 26,164 kms | 32 | 28 | 4 | ||
May 2019 - Off-Road Tour of 1909 kms over 20 days
| Vehicle & Tyre types | Problems | Cause |
|---|---|---|
| Land Rover Series 1 1954 – SBR – Two piece rim/tubed | 2 | stakes |
| Land Rover Defender 130 – Bias - Split Rims/tubed | 0 | |
| Land Rover Defender 110 – SBR – tubeless alloy | 2 | tiny punctures – slow leaks |
| Land Rover Discovery 3 – SBR – tubeless alloy | 0 | |
| Land Rover Defender 110 – SBR – tubeless alloy | 0 |
This trip spent quite an amount of time on small overgrown & forgotten tracks tucked away in the Great Victoria Desert. A very interesting trip and we didn’t have a great many tyre problems considering the condition of the tracks we used for nearly 3 weeks.
The highlight from the tyre perspective was a very tiny slow leak in a tubeless tyre. I started by repairing a "normal" slow leak which turned out to be an old nail in the tread. The repaired tyre was left "overinflated" overnight to check that the patch didn’t leak, standard practicefor me in the bush these days. Before rolling the wheel back to the customer I always check the pressure from the night before and also spray some soapy water on the puncture in the tyre, I’m looking to see if any bubbles are blowing out of the wound channel. Years ago I used to have some tubeless repairs leak a tiny amount but with some help I have worked out a way to make tubeless repairs 95% successful since that time. I have described how to do this in articles in our website tyre section.
Anyway, the tyre had lost pressure and upon inspection of the puncture there weren’t any bubbles. Bit of a mystery, so back to the drawing board so to speak. The next afternoon I spent a fair bit of time spraying soapy water over the entire tyre after first overinflating once again. I didn’t record how long I spent going over that tyre looking for a second leak but it was certainly something like 1-2 hours. I was getting worried about how much water I was going through looking for this miniscule leak but eventually I found it in the sidewall close to the shoulder of the tyre. Tell-tale bubbles of soapy water gave it away and as usual I had been over the same area at least twice. Repaired the little puncture and all was good.
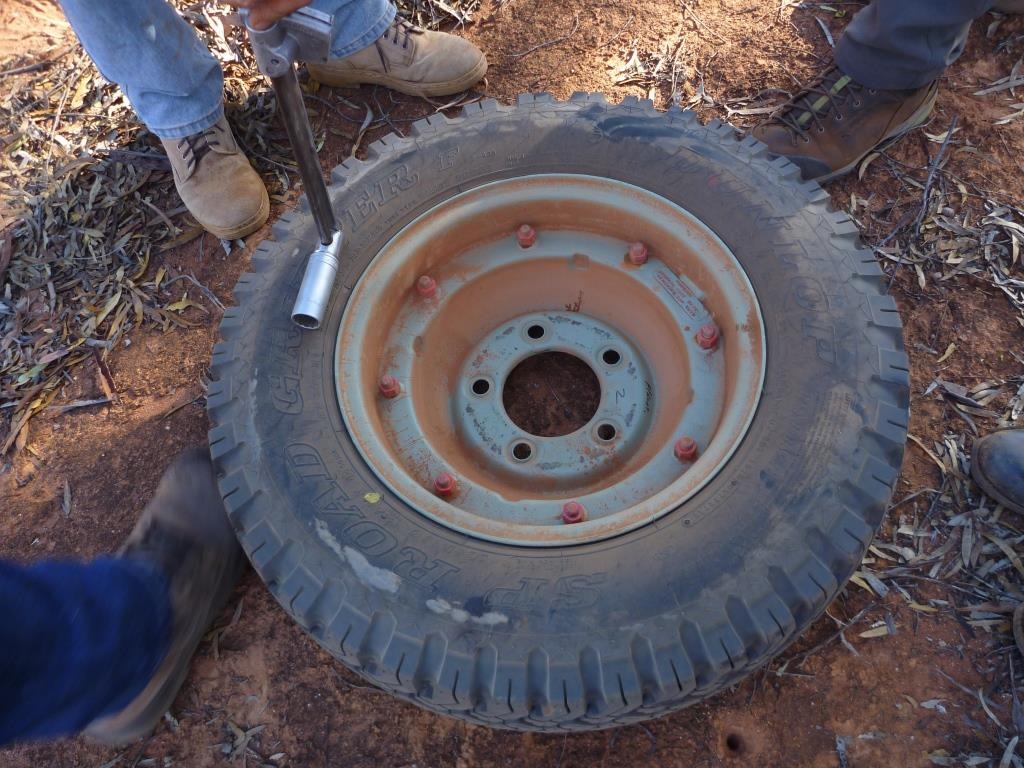
Two piece bolt together 16" rim
Most travellers won’t have seen any of these in the bush. This rim was an option for early Land Rovers in the 1950s as well as the Austin Champ 4WD plus others I’m not aware of. Stud patterns were the same, which was the British Light Truck pattern. How sensible to have a standard stud pattern for vehicles of the same weight range!
Bolt together rims are the norm for big machinery and large aircraft, the reason being that the tyres for such things are so big & thick that the tyres cannot be "pushed" on & off rims like you do with your car & 4WD.
The golden rule for working on bolt together rims is that the tyre be deflated before working on the rim. If you want to undo the bolts while the tyre is still inflated then you have a fair chance of ending up dead, think about it!!
Cundeelee area, Great Victoria Desert W.A. – May 2019
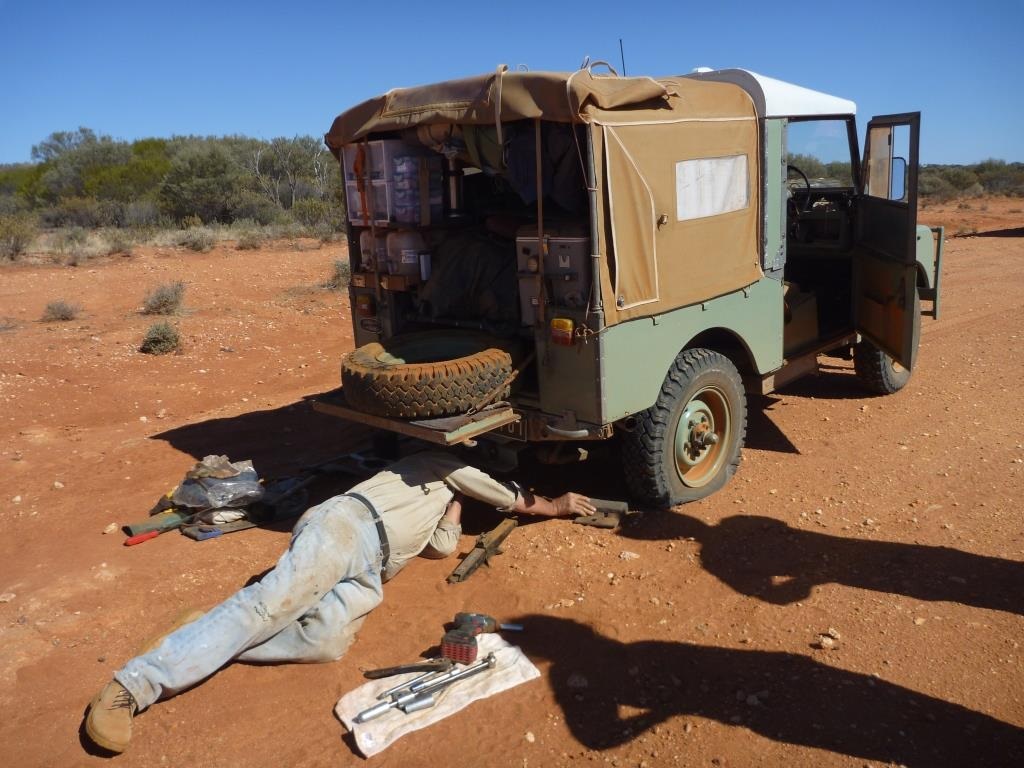
1954 Series 1 model Land Rover in May 2019 with a slow leak
Fish Deposit Haul Road near Laverton W.A. – May 2019
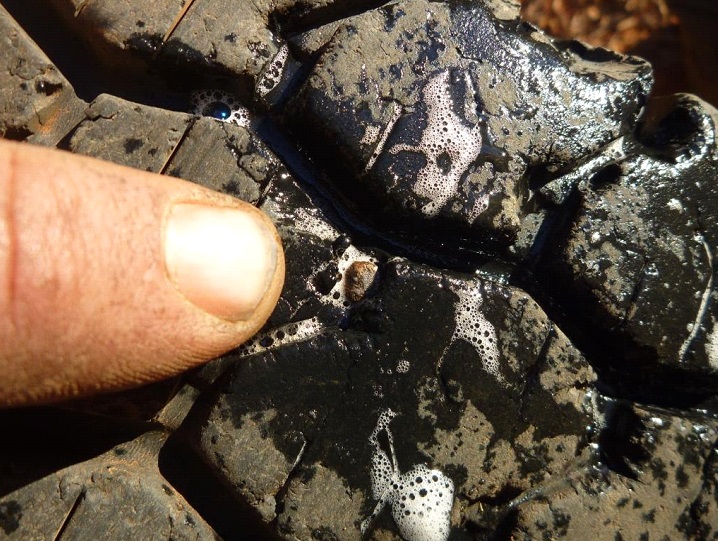
Slow leak in the tread of tubeless tyre – it turned out to be an old nail
Great Victoria Desert W.A. – May 2019
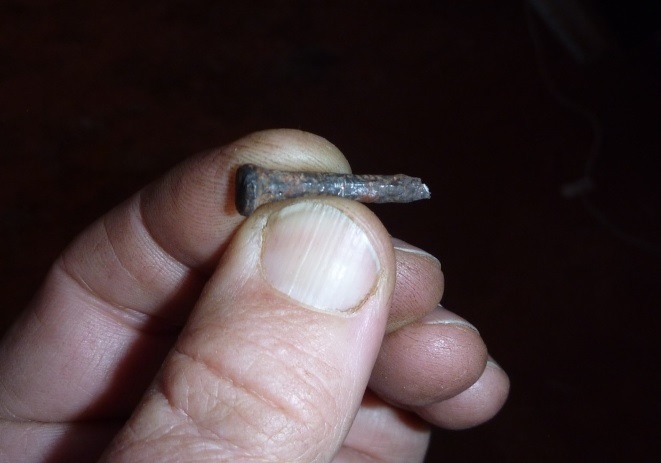
Very old nail that punctured the steel belted tread of a tubeless tyre
near Laverton W.A. – May 2019
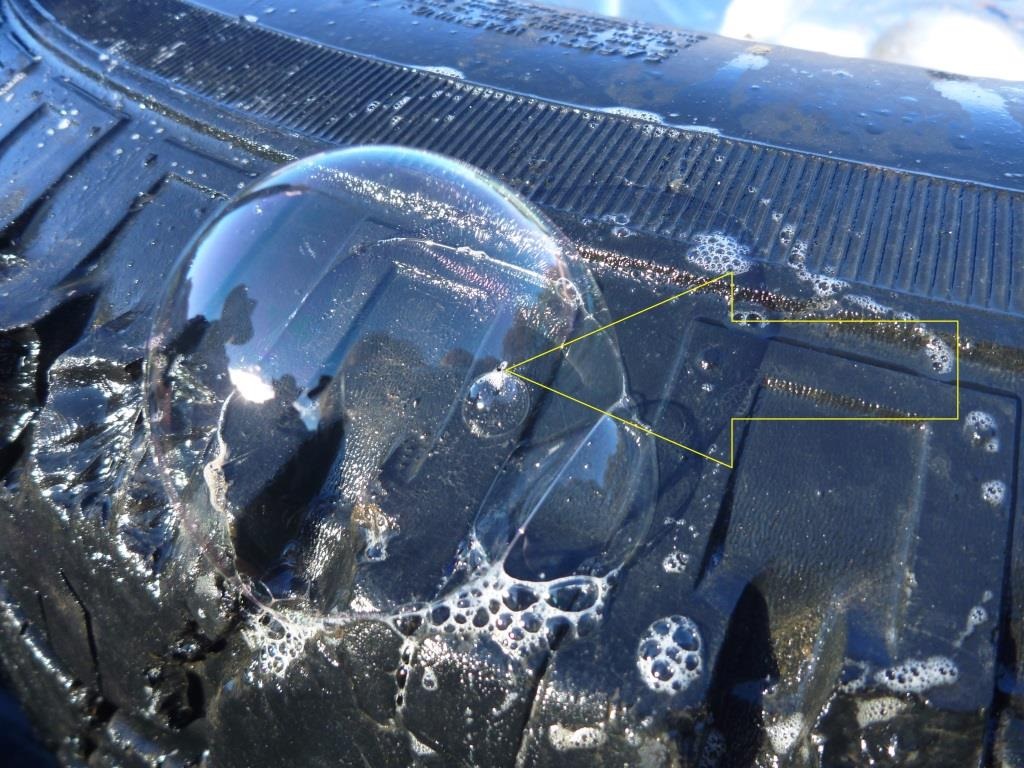
The yellow arrow points at the tiny pinhole in the sidewall of the tubeless tyre. The bubbles are obvious but still this thing took quite some time to locate while camped in the bush. The tyre was over-inflated to about 90psi.
Lake Rason area, Great Victoria Desert - May 2019
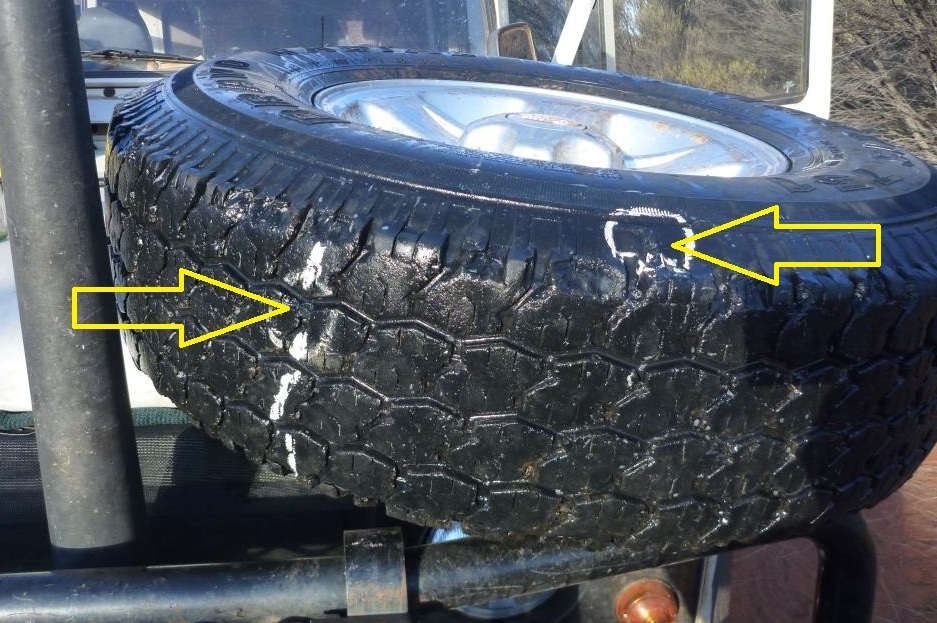
The arrow on the left points to the mushroom combi plug repair for the nail hole and the right hand arrow points at that tiny sidewall puncture and I think that is one of the very few times I have had double punctures in any tyre in the bush. No doubt the second puncture occurred while the tyre was being run with the first slow leak before I made time to do the first repair.
Lake Rason area, Great Victoria Desert – May 2019
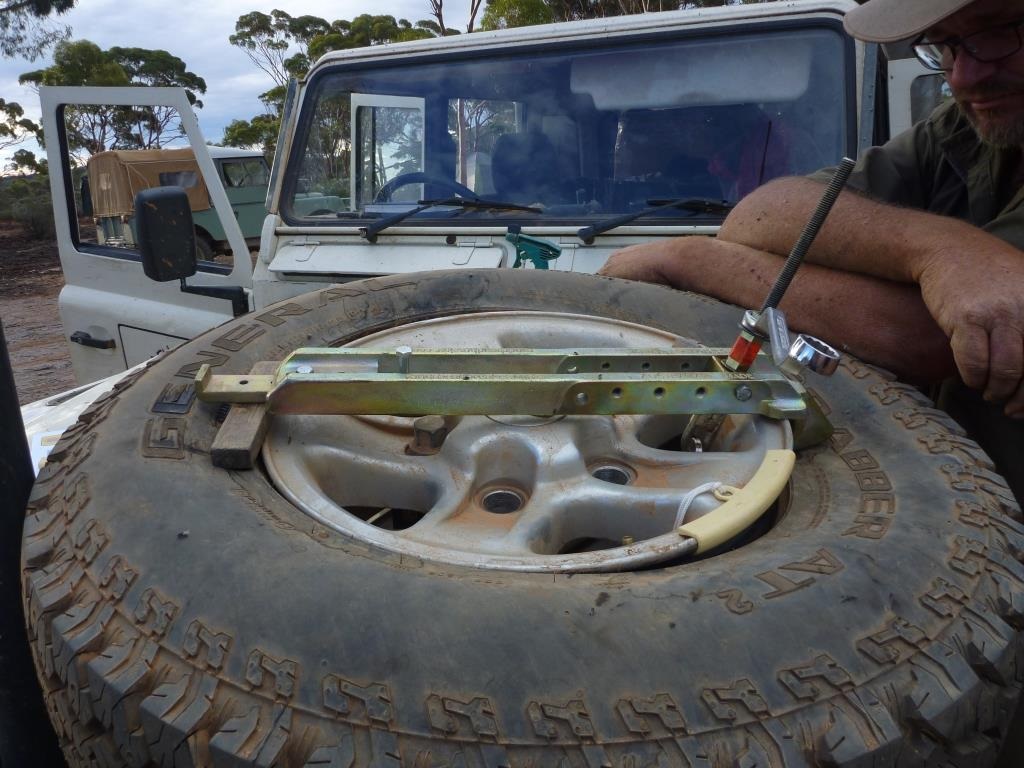
R&R Bead Breaker – solving problems?
Previously one of our travellers tried out his new R&R tool while on a trip with us. We found that the standard R&R tool would not work on the alloys rims of his vehicle, and we spent a couple of hours trying. The fellow went home and put together an adapter to suit his alloy rims that would make the R&R compatible and this trip we tried it out. The mob that make R&R do make an adapter but it is very expensive so our erstwhile companion though he could do just a good a job for next to nothing. After a bit of fiddling around we found the homemade adapter worked really well on these rims and we even managed to work out a couple of short cuts to reduce time & effort when dismounting a tyre from the rim. Good result for a little time & effort.
Koronie branch line – Southern Goldfields W.A. – May 2019
June 2019 - Off-Road Tour of 1933 kms over 22 days
| Vehicle & Tyres | Flats | Cause | Action taken |
|---|---|---|---|
| Land Rover Defender 130 – Bias/split rims | 0 | ||
| Toyota FJ – SBR/tubeless alloy | 0 | ||
| Toyota 100 – SBR/tubeless steel | 0 | ||
| Nissan Patrol GU wagon – SBR/tubeless alloy | 14 | Various small stakes | Repaired as per requirements |
| Land Rover Discovery 2 – SBR/tubeless alloy | 0 | ||
| Toyota 75 troopy – Bias/split rims | 0 | ||
| Toyota 76 ute – SBR/tubeless alloy | 0 | ||
| Ford Ranger – Bias/split rims | 0 |
If you have looked at the results above I’m sure you are wondering what happened? Well it’s pretty simple, one vehicle copped 14 punctures. Your next question is why? That question is not as easy to answer. I’ll try and outline a few of the reasons.
Firstly, the Nissan Patrols have a wider wheel track than the normal size of remote tracks. The outside edges of the tyres often graze or touch objects that most other vehicle easily miss. In years past we have had the same problems with wider wheel tracked vehicles, Patrols feature highly in this data.
Secondly, given the problem mentioned above if you add to that a tyre construction which is "weak" in the sidewall & shoulder then you have to expect a flat tyre tally a bit above normal. I have plenty of reports & stories about how the different tyre constructions behave when confronted by sharp sticks. If you care to browse through our reports from our past seasons as well as our tyre information you will be able to find plenty on this subject.
Thirdly, the owner of this vehicle is not very tall. Even sitting on a cushion the Nissan Patrol bonnet is huge and blocks visibility more than most models of vehicle. (Connie had a GU Patrol and was amazed how much better the view was from a Defender, a shorter bonnet and you sit up higher.) If you want to check this, next time you’re in a group of 4WDs do a little experiment. With the driver sitting in the seat just get someone to stand at the bulbar then slowly shuffle forward away from the vehicle. Get the driver to say when he can see the walker’s feet completely. You’ll be surprised how much difference there is between vehicles.
The fourth reason is usually bad luck, not much you can do about that!
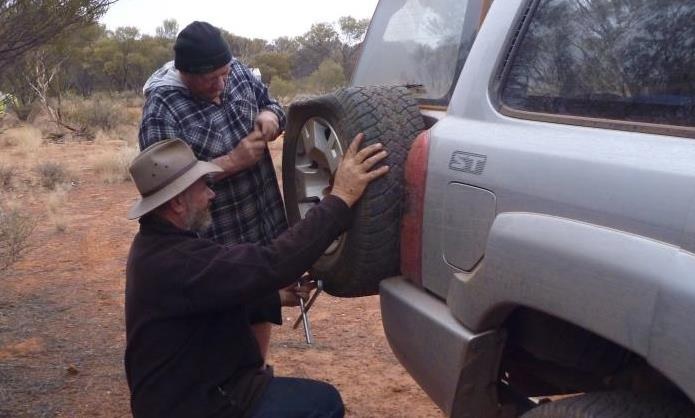
Contrary to popular belief the flat bit isn’t always at the bottom! This was a slow leak on the vehicle overnight that we changed & racked for the day next morning. It had "frozen" into the flat position during the night.
Hanns Track - June 2019
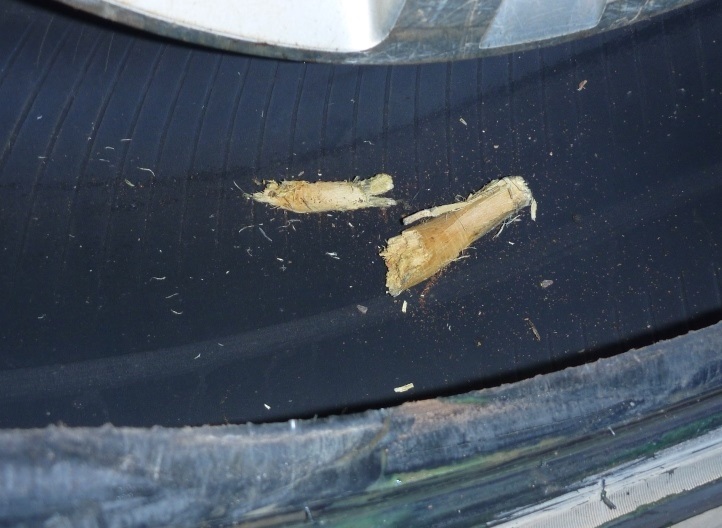
Sometimes the stakes in tyres are much bigger than you first think looking on the outside. It isn’t until you get the tyre off that you get to see the full extent of the trouble. There is a lesson in this, never ever trust what you see on the outside of a tyre, the only way to check a tyre for safety & soundness is by pulling it off the rim to inspect the inside. Sometimes the stakes in tyres are much bigger than you first think looking on the outside. It isn’t until you get the tyre off that you get to see the full extent of the trouble. There is a lesson in this, never ever trust what you see on the outside of a tyre, the only way to check a tyre for safety & soundness is by pulling it off the rim to inspect the inside.
Great Victoria Desert W.A. – June 2019
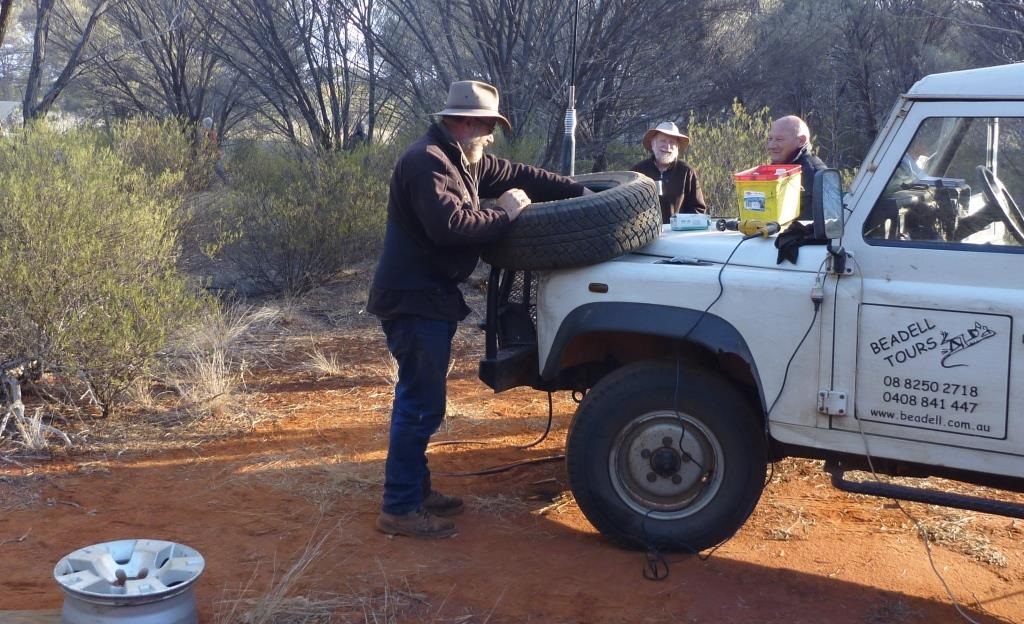
Nothing like fixing a tyre first thing in the morning,
another slow leak overnight if I remember correctly
Lake Rason area, Great Victoria Desert – June 2019
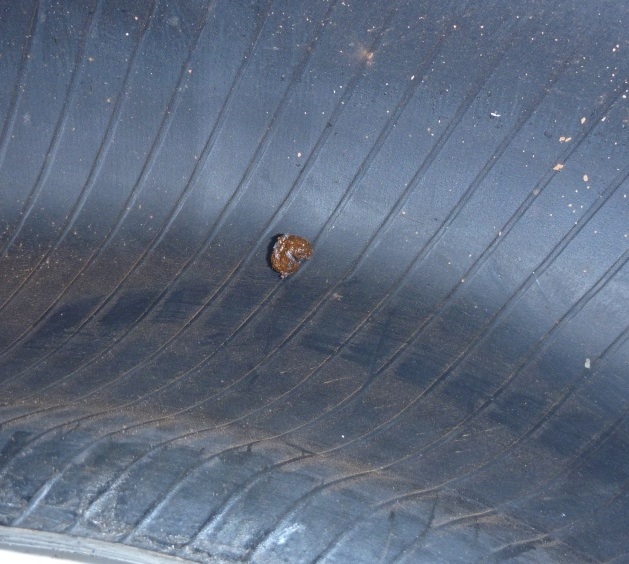
During this trip I did use plugs a few times so we could keep rolling during the day. As usual for our trips the tyres were repaired properly in the afternoons. Plugs are a temporary repair and must be correctly repaired as soon as you reach a repair facility. As I repair tyres that means I am the facility and so I must repair them as soon as I can.
Have a good long hard look at this picture. Think about how strong that plug "repair" must be. Compare it to the following pictures....
Great Victoria Desert – June 2019
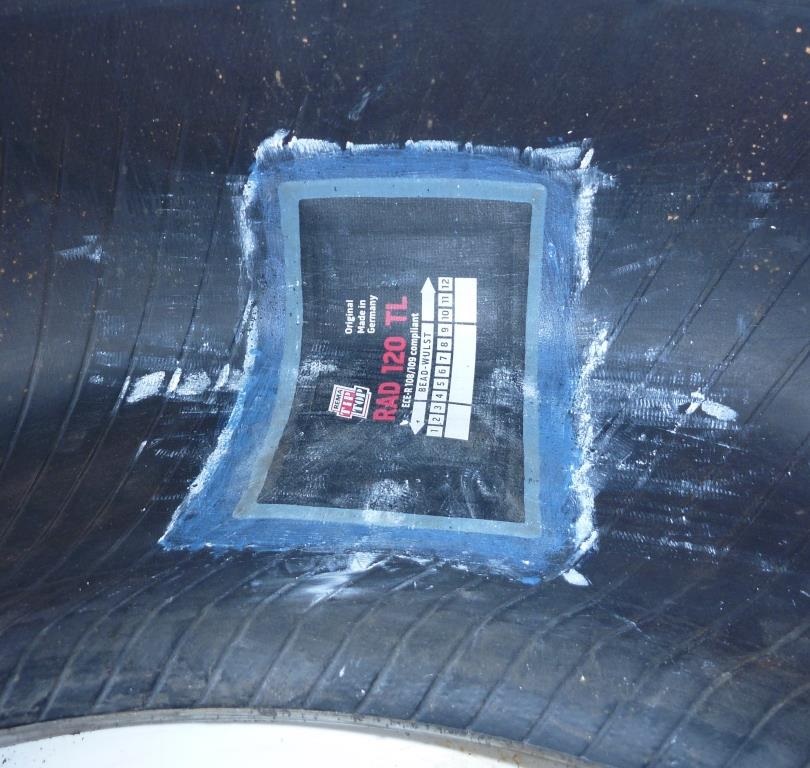
This is the same tyre as the above picture with the plug removed and the correct sized repair patch bonded on. The Patch required and the techniques used are drawn from Rema Tip-Top Major Repair methods and criteria. This means that for a temporary bush repair there is no higher, better or stronger repair. It is simply the best that can be done in the bush.
So, does the above repair look safer than the plug job in the first image? Be honest with yourselves please.
Great Victoria Desert – June 2019
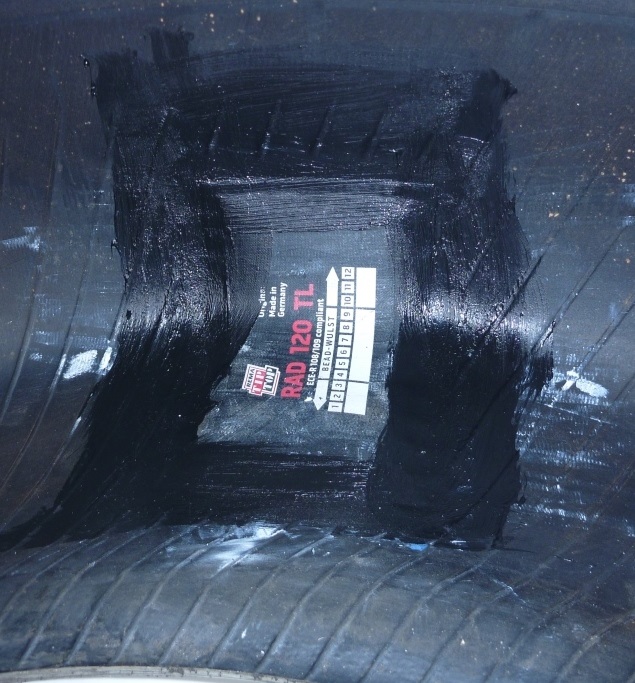
This is the completed repair. You can see that the edge of the patch & repair has been (roughly) painted with a black substance. This stuff is Innerliner Sealer made by Rema Tip-Top of Germany. Essentially it is liquid rubber, it’s used to seal the edges of the patch & repair in case the fella has done a poor job while buffing the patch area before gluing. If you buff off too much you can actually cause a leak through the carcass of the tyre, the black paint on stuff will help with this if the repairer has been a little heavy handed (often the case with folks doing their first few repairs). Anyone who has seen a tubeless tyre repair from a tyre shop should have seen this black goop on the patch & surrounds. Innerliner Sealer is not included in any tyre repair kit that I am aware of.
Great Victoria Desert – June 2019
July/August - Off-Road Tour - 3403 kms over 28 days
| Vehicle & Tyres | Flats | Cause | Action Taken |
|---|---|---|---|
| Land Rover Defender 130 – 7.50-16/ split rims |
1 | Small sidewall stake | Tyre & tube patched & OK |
| Toyota 70 ute – tubeless/alloy | |||
| Toyota 70 Troopy – tubeless/steel | |||
| Toyota 200 & hybrid camper – tubeless/alloy | (1) | Camper tyre plugged before trip | Repaired correctly, used for demo’ |
| Mazda BT50 – tubeless/alloy | |||
| Isuzu D-Max – tubeless/steel | |||
| Toyota 100 Series & camper – tubeless/alloy | |||
| Land Rover Defender 110 – tubeless/alloy |
We had plenty of vehicle trouble on this trip but almost no tyre issues as you can see above. My flat was just a tiny sidewall stake and the other was a tyre from a hybrid camper. The camper tyre had suffered a tread puncture before it joined our trip and the owner had simply plugged the tyre and left it on the road. I used this plugged tyre to carry out my standard tyre repair demonstration early in the tour. During these demo’s I go through a bit of theory, which is simply explaining how & why tyres work, what the specifications mean and the various tyre constructions including how they react to bush work. Then I go through the motions of bead breaking & dismounting the tyre from the rim. Then I repair the tyre while explaining the process and showing folks what each step entails. From that I then mount the tyre back on the rim showing folks the tricks with reseating tubeless tyres. That about rounds out the popular tubeless side of things then I quickly run through a split rim if I have enough daylight, without fail there will be several folks that look at the split rim job and comment how easy and simple it is.
If I’m lucky during the rest of the trip there will be a few flat tyres so the folks that are interested can go through the whole job again or even have me oversee their own tyre repair. There is no way to learn a hands on job without doing it yourself!!!
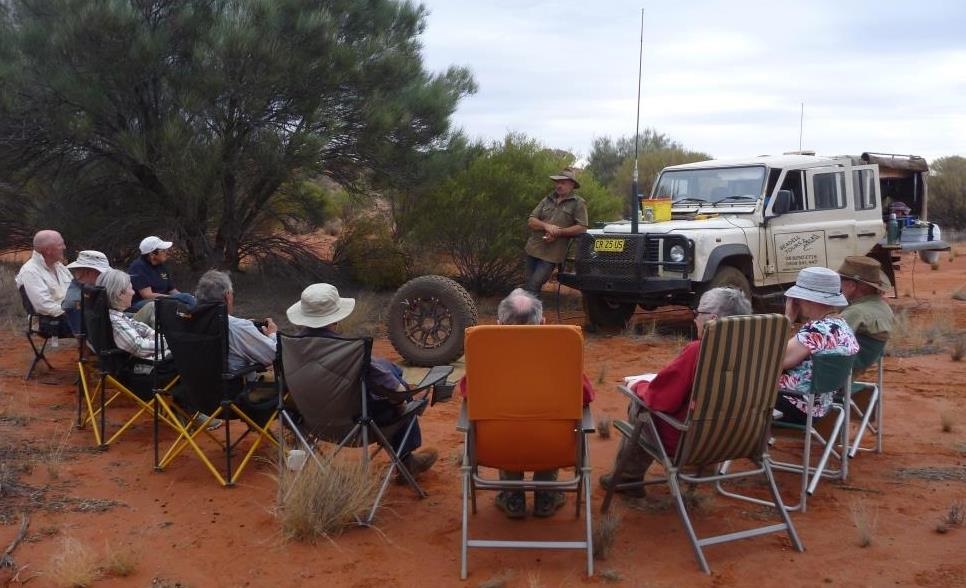
Just about every trip I do a tyre repair demonstration for the folks. Hopefully someone gets a flat tyre early in the trip so I have something to repair. In this case it was a camper trailer tyre that had been plugged prior to our tour. The owner had even taken the tyre into a facility in town and the blokes said the tyre was right to go with just the plugs! Oh boy does the tyre industry have some problems...... I believe they would be liable if an accident occurred because of that tyre. Something to think about!
Anne Beadell Highway – July 2019
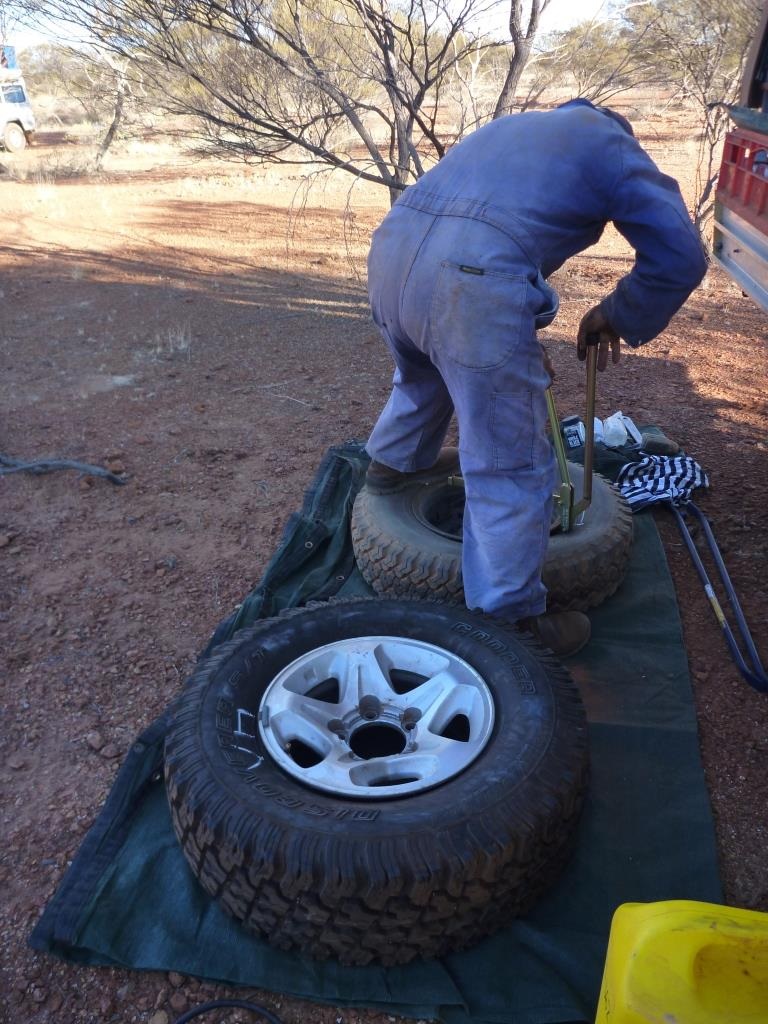
With a bit of spare time one afternoon one of our travellers opted to have a go at dismounting & mounting tyres off both types of rims, tubeless & split rim. Guess what he said at the end of it? Split rims are easier, who would have guessed!!! It’s not often someone has a crack at doing the tyre job themselves with the gear they have brought along for the trip. For the ones that do, they certainly appear to be very satisfied when they realise they can do it themselves.
Gibson’s Desert – August 2019
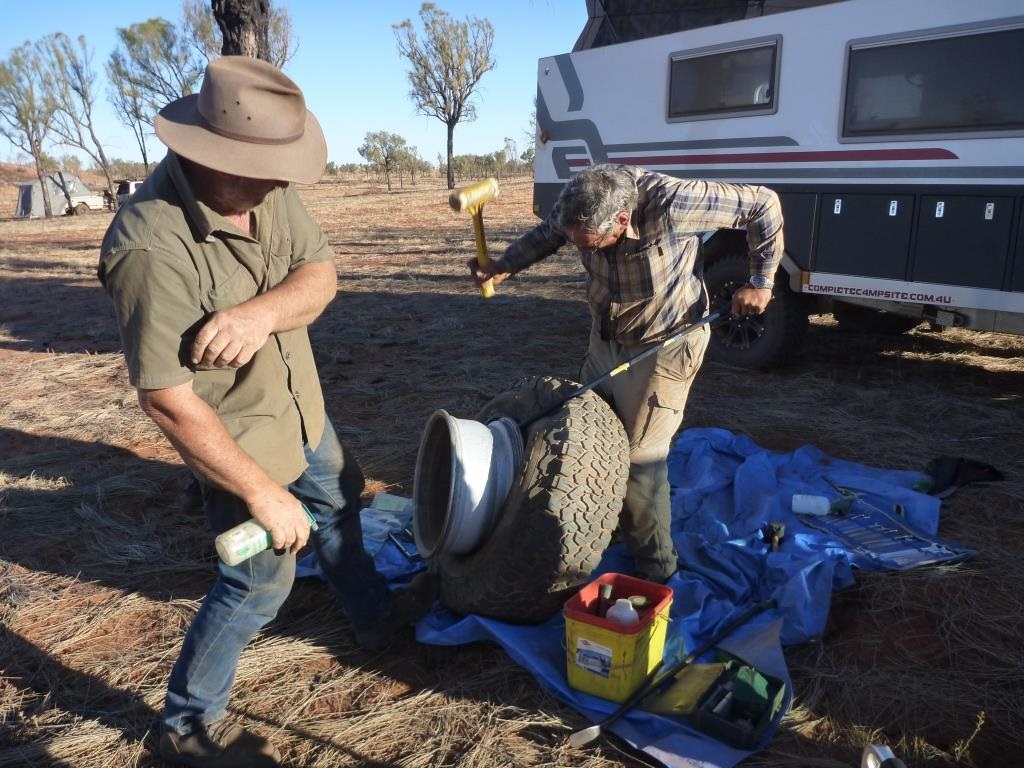
Later in the trip another of our travellers got enthusiastic about doing a tyre and so went to work with quite a bit of energy as you can see. I was doing my best to stay out of the way as the tools got busy! Apart from the satisfaction of doing the job most folks quickly realise that the gear they have is inadequate regardless of where they bought it or what logo is on the packet. Most times the levers are too short to give enough leverage to get 4WD tubeless tyres off rims. Just another example of how the tyre & 4WD industries know bugger all about working with tyres in the bush these days.
Sandy Blight Junction Road W.A. – August 2019
September - Off-Road Tour of 1899 kms over 16 days
| Vehicle & Tyres | Problems | Cause | Action Taken |
|---|---|---|---|
| Land Rover Defender 130 – Bias/split rim | 2 | Slow leak - tube crease
Slow leak - old damage |
New tube
Replaced tyre & tube |
| Toyota FJ – SBR/tubeless alloy | 1 | Minuscule slow leak | Repaired correctly |
| Land Rover Defender 110 – SBR/tubeless alloy | |||
| Toyota Hilux & camper – SBR/split rim | 1 | Not sure? | New tube fitted, tyre OK |
| Land Rover Discovery 3 – SBR/tubeless alloy | |||
| Land Rover Discovery 2 – SBR/tubeless alloy | |||
| Toyota 200 Series & camper – SBR/tubeless alloy | 1 | Small sidewall stake | Repaired correctly |
| Land Rover Defender 130 – SBR/tubeless steel | |||
| Traditional Owner – our guide for couple of days
Mitsubishi Pajero – SBR/tubeless alloy |
2 | Tyre run flat
New tyre wouldn’t go on rim |
Destroyed
Made it fit......boom |
For a small trip we had a bit of tyre trouble. Most of it was pretty standard. The highlight in the tyre department was helping out a local Traditional Owner whom we know with a couple of tyre problems. Initially we found our mate pulled up on the side of the road with a run-flat tyre, it was stuffed. I had pulled up and changed the tyre and did a few other tyre jobs at the same time before we could get underway once again.
The next day further west we again bumped into our mate and pulled up for a quick yarn. Turns out I got another tyre job and after a bit of fiddling about I had to cheat to get the job done. You’ll see in the images & captions below what I’m talking about.
The lesson learnt is simply that you never know what may happen in the bush, so be prepared!
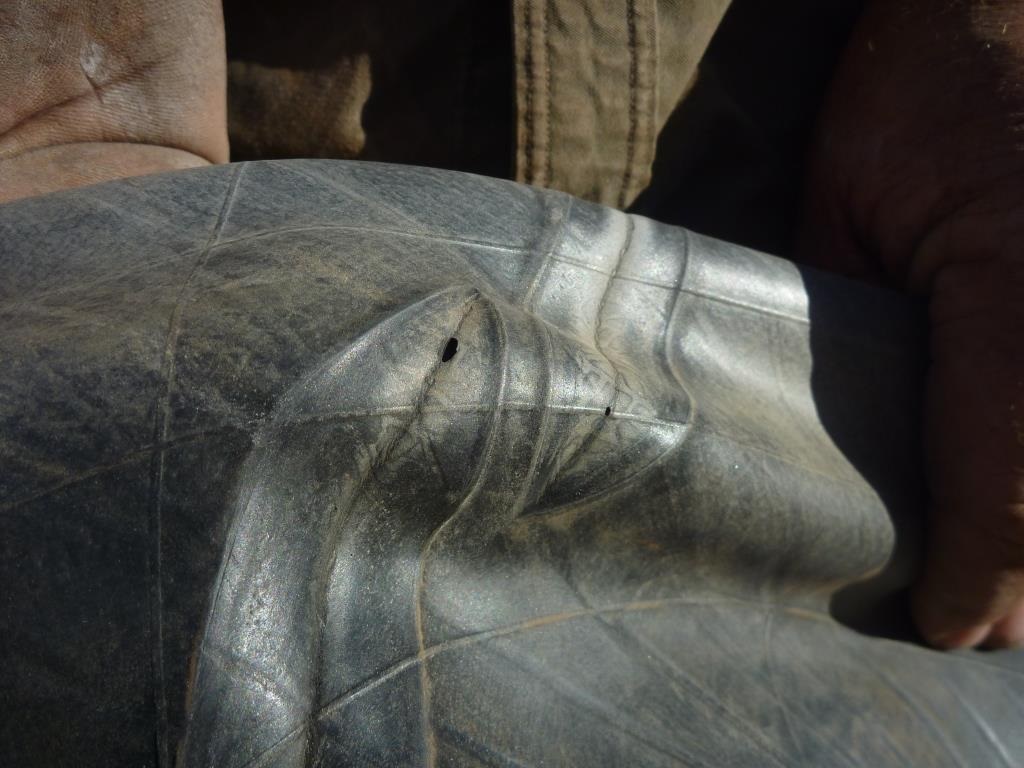
This was my fault, I fitted a set of new tyres with the old tubes while in Perth between trips and I was in a hurry. This was the result a few weeks later while out in the bush.
Tubes require some technique to handle well and being patient is one of them particularly with "old" tubes which have been stretched. I believe that one of the reasons that new tubes are significantly smaller in size than the same size tyre is that when fitting there is no danger of creasing the tube, it goes in and has to expand quite a bit to fill out the inside of the tyre. When using an old tube it is much the same size as the tyre so you must be careful when fitting the old tube, which is why inflating a little and then checking for any problems is standard practice.In my case I should know better but as always racing the clock forces errors which catch up with you later down the track, so to speak.
Ngarngurr Outstation, Central Ranges – September 2019
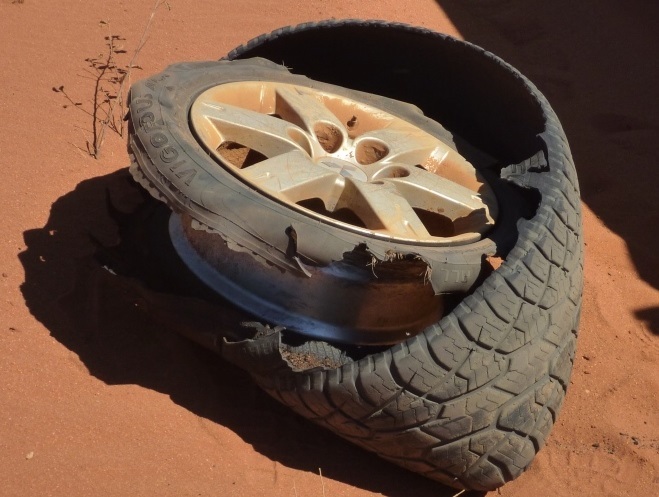
It took less than a millisecond to evaluate the repair potential of this tyre – none!
This tyre brought on a series of events over a couple of days, I’ll explain. We had completed one of our detours with our guide, a local Traditional Owner who Connie & I know quite well. We were all heading for Docker River Community when we came up to our guide pulled up on the road with the above flat (destroyed) tyre. I waved our group on as they knew where to camp and pulled up to help. After a bit of fiddling about I was able to put the spare on (it needed a bit of work before fitting) and do a couple of other tyre jobs and that got our local mate underway, it took less than an hour and everyone was happy.
Petermann Ranges, Great Central Road N.T. – September 2019
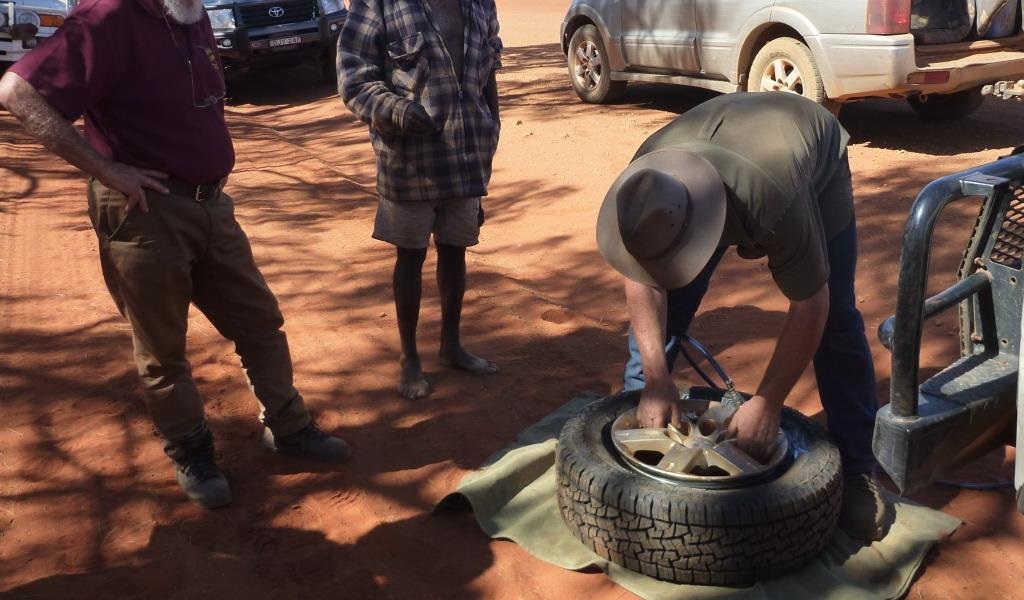
The next day we were poking along heading west when we passed our guide of the last couple of days heading back home to Docker River from Warakurna, he & his wife had been over to see their daughter. We were waved down and of course knowing the vehicle and the occupants we pulled up for a yarn. We weren’t in any hurry and that is what you do in the bush. After a quick chat I asked whether the tyre from yesterday had been replaced. The answer was yes but our friend still had a problem, I was asked if I could have a look.
A wheel & tyre were produced from the back of the bus but the tubeless tyre had not been seated so was useless. I got my gear out and started seeing if I could carefully get the tyre & rim in the right place to hold enough air to pop the beads onto the safety humps. I fiddled about for a while but as the tyre was fairly narrow for that width rim I was fighting a losing battle. Apart from the width factor the tyre was new so wasn’t the right shape in a sense. Older fitted tyres retain the right shape to fit on the rims they have been on, a new tyre does not do this, it’s been stacked in a container and on a rack since production so often they just don’t want to inflate & seat.
Giles Creek, Great Central Road W.A. – September 2019
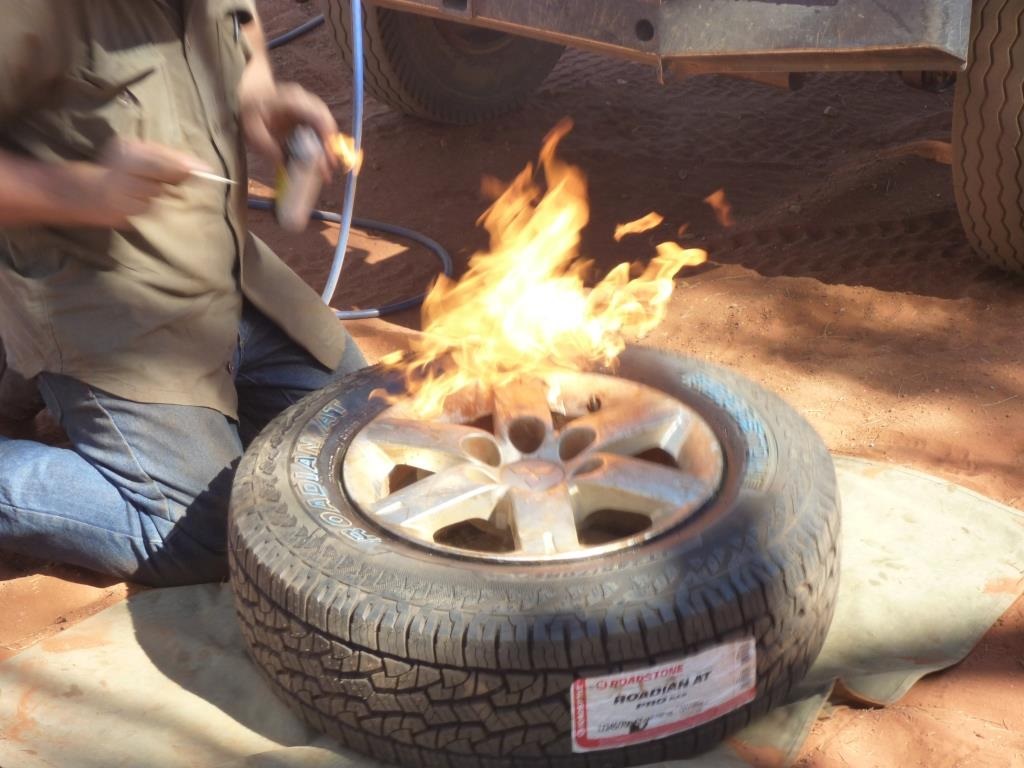
Last Resort
Running out of options I was forced to go the pyro route to get this tyre on. As I mentioned above, the tyre was too narrow for the rim. There are only two solutions for this problem, fit a tube or "pop" the tyre on with combustion of a flammable gas. I didn’t have a tube that would fit handy as I don’t run tubeless tyres. I was left with the pyro method. I have only had to do this on a few occasions and all were last resorts while way out in the bush a long way from anywhere. I don’t think it is the safest way of doing this job but it does work if you are careful & sensible.
Borrowing a can of "Start Ya Bastard" which has a goodly content of Ether I sprayed 1-2 seconds worth of spray into the tyre. You don’t need much at all. Then without waiting I lit the gas up and bingo, one seated narrow tyre on one wide rim.
Four things about doing this;
Giles Creek, Great Central Road W.A. – September 2019
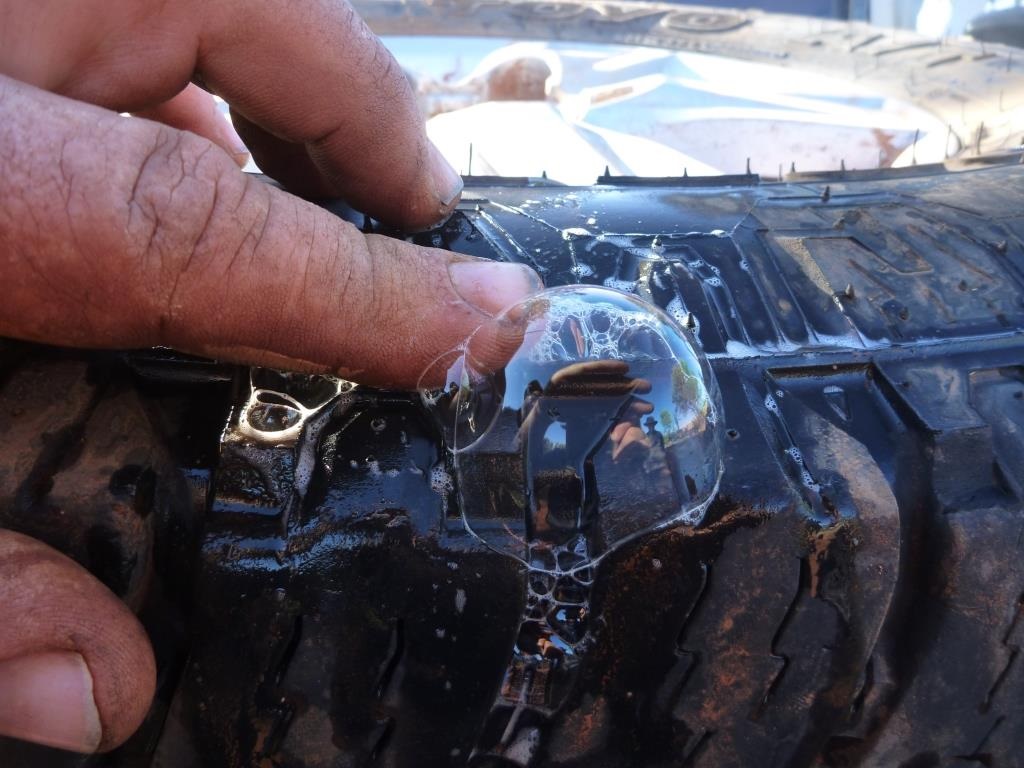
Another slow leak in a tubeless tyre – the best way I have found to find these little blighters is to over-inflate the tyre to 80-90 psi and then listen, if nothing comes up then start with the soapy water.
Now before anyone says you can’t inflate a 4WD tyre to that level I’ll just ask them to have a think about the physics. The pressure rating on your tyre is derived from that tyre being fully loaded and going at its maximum speed. The maximum pressure is what is needed for that tyre to operate at that speed carrying that weight in all temperatures with some safety margin. So if the tyre & rim are stationary with no load at all it makes sense that the tyre can be inflated more than the rated pressure. I seem to recall there may be some data on this in the Tyre & Rim Association Manuals which are printed each year and are available to the public for purchase.
Old Warburton Road W.A. – September 2019
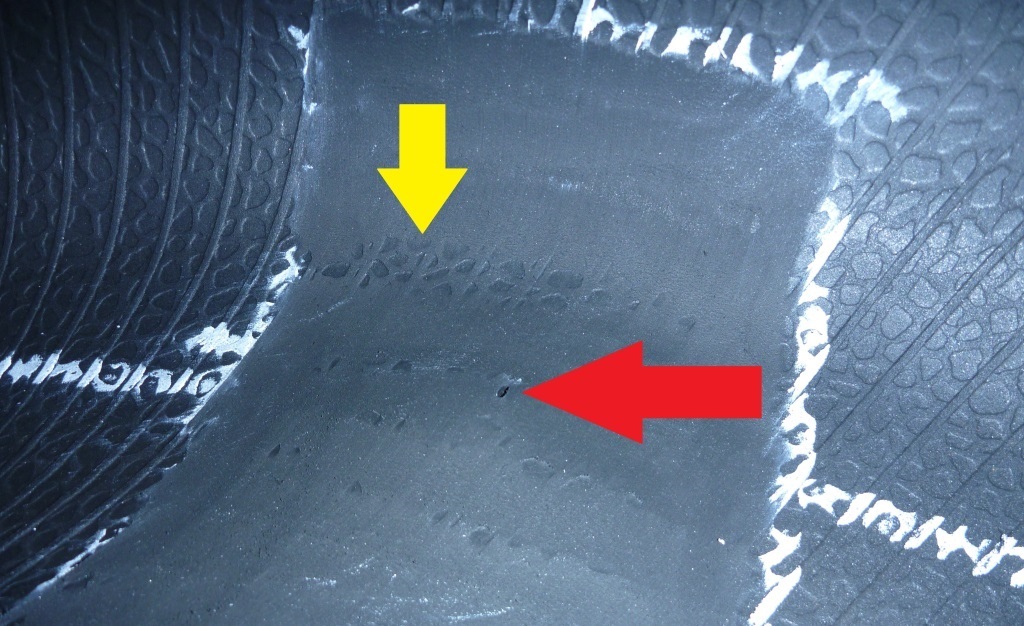
This is the inside of the above puncture, the hole was that small that it was difficult to see, so this image I’m pushing my finger on the outside so the hole shows up better for the photo. The red arrow shows how small it is.
Now the yellow arrow should actually be of greater interest. The yellow arrow is pointing at an area that has not been buffed fully. As you can see over most of the rectangular area nearly all of the pattern & ribs of the insideof the tyre have been buffed off in preparation for the glue & putting on of the repair patch. If you can still see bits of this pattern & ribs then buffing has not been completed correctly. For the glue to work properly it needs clean buffed rubber, none of the original surface should be there as it is covered in mould release and preservatives from the factory and on a microscopic level it is also too smooth. Buffing does both jobs, removes all of the gunk that will contaminate the glue and therefore the bond strength and roughs up the rubber to give a greater surface area for the glue to bond on.
Old Warburton Road W.A. – September 2019
Not much out of the ordinary really this year. I should say nothing we haven’t seen before. Still it is best to record what happens as it may be of use to someone in the future. During the season we had a few tyres either run-flat or unserviceable for whatever reason. Nothing unusual about this, tyres can & do fail, they have a tough job to do. It’s not easy being a tyre in remote country, think about it. Below are a few follow-up thoughts, some I have mentioned before so there shouldn’t be any surprises.
These are the topics covered;
I wrote about this in last year’s report & this year I kept using the over-inflation method to "seal" a fresh tubeless tyre repair patch. Quite simply it seems to work really well. So much so that it hasn’t failed me in the bush yet.
After repairing the tyre with a patch and painting with Innerliner Sealer the tyre is remounted onto the rim, the beads seated and then the tyre is inflated up to 70-75 psi cold. (If the patch has failed miserably I can always hear the air pouring out of the puncture channel, this happens occasionally.) I then write in crayon the pressure figure onto the tyre (in case I forget) so in the morning the pressure can be checked to see if there has been any loss. So far the repairs have held overnight perfectly.
It’s more likely a combination of several factors that I have found over the years through experience, these are listed below;
Certainly the over-inflation method does work. I’ll keep using it in the bush & at home and see how things go for next year.
Now for anyone who says you can’t overinflate a tyre to some degree, not true. Please check the Tyre & Rim Association manual for further information.
If you have a miniscule leak in a tubeless tyre, for example, losing a few psi per day, then you are in for some fun. The only way to find such a problem is to over-inflate the tyre to about 80-90 psi. Sometimes you might need to go even higher if you have no luck finding the leak.
Once inflated then you have to spend some quiet time searching the surface for this little jet of air. If the leak is big enough you may hear the air escaping. If you can’t hear the leak then soapy water with a spray bottle or wiping small sections with a wet rag will be the easiest way of looking. You have to be patient and methodical. Slowly work your way around the tyre wetting it in small patches at a time. In time you should find a patch that blows bubbles with the soapy water.
Mark that spot straight away. You’ll be amazed at how small the damage will be. Now you can go ahead and start the business of repairing the damage to the tyre.
**Something folks might want to try at home before going bush is actually over-inflating a tyre with their own 4WD compressor. I have seen over the years the small compressors with thermal over-heating switches struggle to inflate tyres in general let alone pushing a tyre to 80-90 psi. Something to take into consideration folks.
For those of you following this saga I’m sorry to say this season I wasn’t able to carry on with the experiment that has been ongoing since 2016/17. For various reasons I just didn’t get time to set up tubes with experimental repairs to run on our commercial tours this season. However I did get hold of some REMA UP patches that have a single ply in the construction. Unfortunately I haven’t yet had time to use them. I hope to get back on track in the 2020 season. Stay tuned folks.
![]()
BEADELL TOURS
Mobile : 0408 841 447
Email : Beadell Tours
ABN : 40 947 959 130